
 A few years ago (January/February of 2012) we updated our basement. Previously it was a large open space that felt a little cold and it’s shape made it odd to furnish. EDIT* Please read the entire post and comments. I made this post in 2013 originally, to share the trials I went through before this became popular online. There wasn’t any information on how to pour how thick to pour etc. Especially for this type of pour. As I say in the post I share the way I did it and how I fixed it to help someone in the same situation. I have done this again a few times since and I always to a light pour just to seal the corks first then do two more light pours to fill. Sometimes if it’s not perfect, I sand and do a final coat. Hope all of this helps you with your project.*
The room had is where our gym equipment, a sofa and chair, a hutch with a tv, and our piano all sat mismatched together. Our main level had a small living/dining area that wasn’t big enough for entertaining or for family gatherings. A basement renovation made sense for our family and with the amount of entertaining we did for our work.
My husband had never really wanted a mancave in any of our past homes, but it made sense in this home and a great feature for resale. At the time I had worked part-time as a cabinet maker’s apprentice. I loved the working in the shop, but my shoulder eventually decided it couldn’t daily do that type of work.
When planning the renovation I couldn’t decide on what I wanted for a countertop. The artist in me prefers unique and the frugal part of me loves getting great quality for less. Many years ago, when Debbie Travis was on TV, she did a project where she made a tray where she placed pictures, lace, shells, and little things that were important to the homeowner and then poured an epoxy over the top. I always wanted to make one of those. This project developed from that idea, to building a coffee table with the same idea but filled with corks, to this.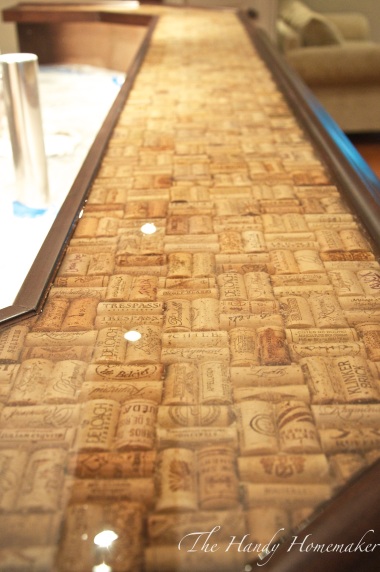 As the cabinets were ready to be installed and the project was coming along, I changed gears from the coffee table to why not turn that idea into a bar top counter. I explained to my cabinet buddy (CB) what I planned and he helped build a tray for me to do my magic in.
Materials:
- Level tray/pan with plywood or wood surface with frame
- Table or Bar top clear Epoxy on eBay
- Corks- (approximately 84 corks a square ft)
- Glue (wood glue, gorilla glue, I had carpet glue on hand that was the same color as the corks so I used that) The glue needs to be clear or similar color to the corks once dry.
- Clean wooden stir sticks (paint sticks)
- Rubber Squeegee or Rubber Spatulas
- scale or measuring cups
- sharp knife and/or mandolin
- Large Clean Container for mixing. I used a large bucket
- Disposable gloves (This is a sticky product if you get it on yourself)
- small level
- Clear silicone caulk and caulking gun
- Clean rags/old cloth for clean up
- Painters tape and plastic sheeting to cover areas you don’t want to get epoxy on
- toothpicks to break bubbles
- heat gun
 Here is the front panels of the bar before the corbels were installed. The length of the bar is roughly 10’x3′, the depth of the inside tray is 11″. I didn’t have this blog when this room was finished and I only pictures for my personal record. Which unfortunately means I am missing pictures of a few steps. I think you can get enough of how to recreate this yourself with the ones I did take.
 Here is what the corbels look like once installed. We installed corbels across the front edge of the front panels of the cabinetry peninsula. Then attached the 3/4″ plywood base to fit the space. Edged the back with strips of stained and finished 7/8″ x 1-3/4″ birch. The edge piece was glued and nailed to the edge of the plywood base with a 1/8″ bottom lip. The bar rail was attached to the front of the plywood. The highest point of the bar rail sits 1/4″ higher than the back edge.
 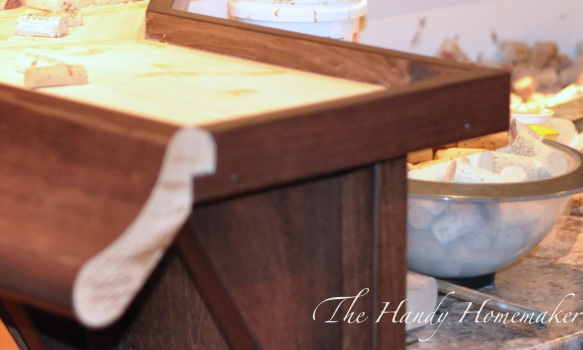 Here is how the end of the bar rail looked like once cut and attached on site before stained and sealed. The back edge rail had to have a custom notch to accommodate the curve of the bar rail.
 Here you can see the shine of the silicone caulking that I place in all corners and joints to prevent the epoxy from leaking once poured. This step is very important
 I’ll just put this out there. I used a lot of corks!!! There is about 84 corks per linear foot of top. That’s about 1100 corks in total!!! Did I drink all that wine, you ask??? Well, a couple special corks came from bottles that were enjoyed by me, however, I ordered the bulk (2000 corks) from an eBay seller. There were many corks that were from wine kits, which I didn’t like the look of for my project. I would message any seller and ask that question before hand if I was buying again.
IF you cut them directly in half you will need half the amount. I wanted them to look like full corks so to give this illusion I didn’t cut them directly in half. I cut so that a little more than half of the cork would be remaining. This also depended on the cork thickness (depth) as all corks are not created equal. As a guide I picked a 1/2″ as my measurement and tried to keep each cork close to that depth. It doesn’t need to be extremely exact….just close. When I planned the depth of the countertop pan/ tray to set the corks in, I planned that the depth may be slightly off. The pan was 1 inch deep, 1/2″ corks, 1/8-3/8″ lip to accommodate spills. This meant epoxy would be about 1/8 to 1/4 thick over the top of the corks. You will have a little room to play with. * If you don’t have a straight or square pan to fill save all the little pieces of cork. They will be needed to fill in the small spaces next to the edges on the turn as shown below. I used a cheap mandolin to take off any excess height of the cork. Of course, you could use the sharp knife or a good sharp vegetable peeler works too. Please use the slide attachment that goes with the mandolin and be extra careful. Especially if you have never used one. Mandolins are very very sharp!
  I didn’t take a picture of the lines I placed on the wooden pan to use a guide to keep my lengths of cork straight. I decided to use a two by two pattern alternating the corks. I matched cork sizes up in rows of two before hand that way I could make the rows look even. Not only are the corks not the same diameter but they are different lengths. So keep that in mind when you are laying them out. *You can see in this photo the why the small bits and pieces of cork are needed when you have turns or angles in your top
I did something special in the weeks before the top was ready to be made. If we were out to dinner, or if we had guests in, I would get them to sign a cork to be placed in the bar top.  You can see my trays of pre matched up corks in rows. Keeping them in pairs helped make laying them in place much faster and limits mistakes like the rows being off.
Keep a small level with you as you lay down each row checking for level as you go along. I play a row down. Make sure it fits in straight and equal, then I lift that row being careful not to mix up, spread the glue in place and press the prepared corks back in place. Check again for level of the glued down corks every couple of rows.
 I kept the corks level the entire way across. This end was slightly out of level because the floor was so far out of level on the turn. I divided the difference between the bottom of the bar unit and the counter. This meant that these corks were a little thinner and that end had close to a 3/8″ lip (top of epoxy to top of wooden pan) vs a 1/8″ lip across the straight stretch.
  After all the corks are glued in place let dry overnight. Then using painters tape, tape plastic edging to the sides of the bar rail and back rail. Then take another strip of tape are carefully place along the edges to keep excess epoxy off. If you do get epoxy up the edges you will need to wipe off the excess before it hardens.
 Plastic sheeting taped on the sides and the floor of the area.
 Mix the epoxy as per the manufacturer’s instructions. It was in the winter when I was doing this project so I placed each of the two part epoxy containers in my sink filled with hot water. This makes the epoxy easier to pour and mix together. The two part epoxy I used was extremely easy to mix together. I used spatulas to mix the epoxy to scrape as much of the mixture away from the bottom and sides as possible while stirring with slow and smooth motions. This helps prevent soft spots of epoxy that wasn’t mixed well. I will be mixing the first seal coat to seal in the corks and then finish with a 1/8″ thin finish coat.
 Once you have finished mixing the two-part epoxy according to the directions you are ready to pour. Slowly start pouring the epoxy over the corks while spreading with a spatula to get in all the nooks and crannies between the corks.
 This is definitely a good time to get extra hands. Mr. Handy, our son Cameron, and our friend Pat are on board to help with pouring and spreading the epoxy. I had never seen this done nor could I find any information on how to do a project like this online so we are winging it.
  Yes, that is a set of my work pajamas. LOL Surprisingly I am not wearing my favourite paint covered pants and T-shirt. Part of the reason I don’t like to make videos or be in pictures is that I don’t have time to “doll” up when I am in the middle of projects. So this is what I look like. Ok now that we got that straight. Keep spreading the epoxy.
 Using your squeegee or spatula keep spreading and pushing the epoxy into the corks and spread to the edges. It’s still heavy and gel like because it is cool in the basement. However once we hit it with the heat gun it starts to spread and sink in around the corks a little more smoothly.
  I had to mix up another small batch of epoxy to finish the pouring.
 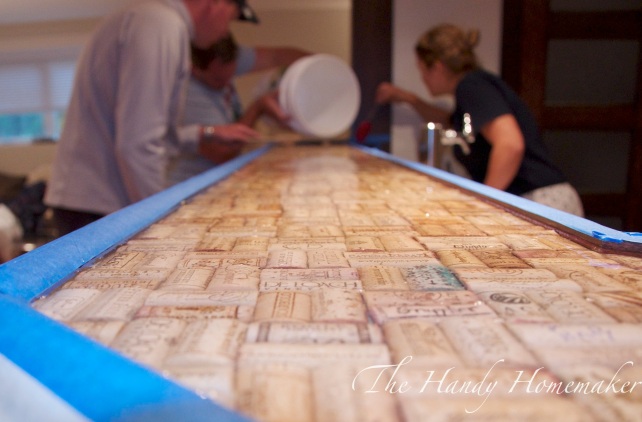 Looking good! Now immediately wipe off and then remove that protective layer of painters tape that is against the bar rail as you don’t want any epoxy that may have gotten on it to harden with the tape underneath it.
 Using toothpicks to break bubbles and direct the epoxy into the corners
 Now to apply a little heat from a heat gun. This helps the bubbles rise to the surface. I stress… Use a little heat. Less is more in the case of 2 part epoxy. Using a hairdryer could make ripples in the finish.
 Ok……. Here is why I needed a tutorial like this when I did this project. DO NOT UNDER ANY CIRCUMSTANCES APPLY TOO MUCH HEAT!! I can’t stress this enough. What happens is that if the epoxy is too warm and your room is a little cool, the top will start to cool and set before the underneath epoxy that is yet to harden. I was going to leave this part out and tell explain only how to get to the finished project. However… If your over zealous like we were, well… the next few steps to show how to fix it are important.
 Overheating caused the epoxy to release bubbles to break the surface that is cooling thus giving you large stalagmite style bubbles along the surface, and all you can do is sit back and watch it happen. Well possibly you might sit down and cry for a few minutes like I did. I said this project was unique, and less expensive, than say… a granite countertop, but it is not free. I thought I ruined everything.
  This is not how I pictured the day ending. Our friend Pat decided it was time to head home before he witnessed me bawling my head off. I went to the internet and tried to find the epoxy stalagmite expanding help desk. Unfortunately there wasn’t one that I could find. Mr. Handy was so sweet in trying to reassure me that it didn’t matter. Worst case scenario we need to start from scratch. Start from scratch!!! Are you crazy…. That’s a huge waste of time and money. I cried a little longer. Then I fell asleep. In the morning I woke feeling refreshed and I had thought an idea on how to fix it. I used a wood hand planer to chip, and scrape off the large pieces of epoxy, sanded with course 60 grit then 100 grit sandpaper and then another thin 1/8″ pouring of epoxy.
 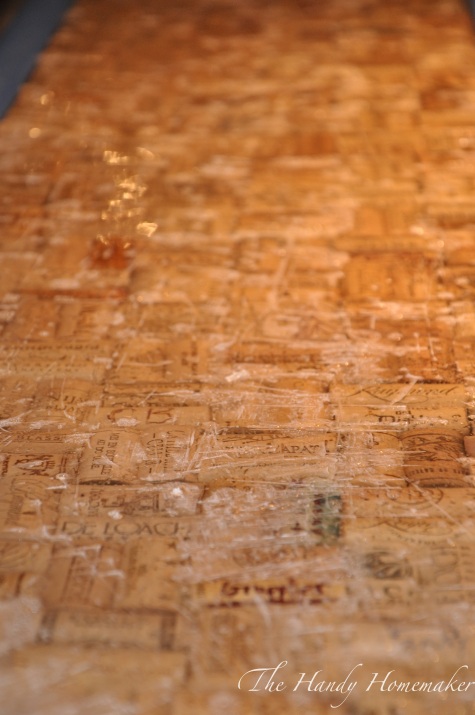 I scraped off the stalagmite sized epoxy.
 I used the edge of it to dig out some large bubble that were just under the surface.
 Then I sanded it as smooth as possible taking care to tape out the wood and not hit the sander on the wood.
  It looked like this and yes I was still worried. I vacuumed and cleaned up as much of the dust and chipped epoxy as possible. I wiped it down with acetone or alcohol and then poured a thin layer of epoxy. Smoothing it out to the edges and corners. Remove the protective tape and then give it a light pass with the heat gun and let it harden. The humidity and how cool or warm the room you are working in affects drying time. Do not touch it!
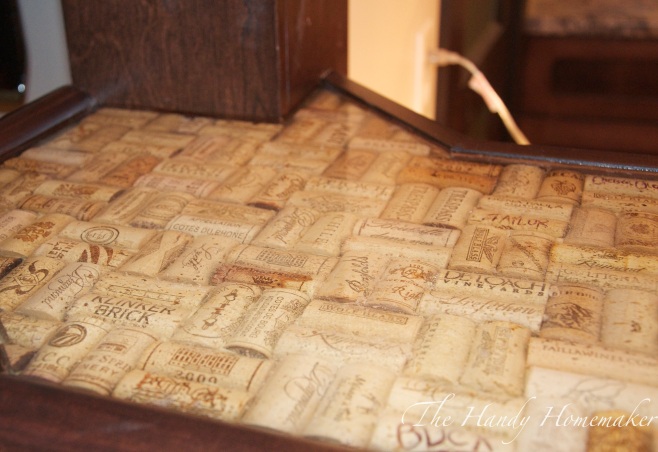
I walked away and left it and a few hours later it looked like this!!  It was hard, shiny and smooth!! I just love it!!
 The corks are clearly visible and most people think it is topped with glass.

 When the basement was finished we toasted to it’s completion. Myself, my daughter Chelsea and my gf Heidi.


37 responses to “Make a Bartop or Countertop with Cork & Epoxy”
You must have the patience of a Saint! What a beautiful way to finish a counter top! Love this and you have a great story to tell when you sit down to have a drink!
Really nice!
LikeLiked by 1 person
Thanks Collete. We do love it, and it’s a conversation piece. It definitely isn’t a 1 day project as the corks take the most time to prep. I gave myself time during the week to finish the cork layout. (Netflix and bubbly is required).
LikeLike
Mina, you are amazing! I almost cried when I saw the pics of all the bubbles!! How you were able to stay with it and produce such a piece of art is a testament to your talent.
LikeLiked by 1 person
Janet, you are so sweet. Lots of my projects are just stuff I make up or and idea that try to figure out. I’m human and I mess up from time to time. Figuring out how to fix mistakes is part of the process and another challenge to keep learning. Now in the future when I use epoxy, I know to never apply 10-15 minutes of heat from a heat gun 😉
LikeLike
A few weeks ago I was watching a tuturial on YouTube about building a tree house that made me think of you. You really should do some how to videos and if you have them wear the paint stained sweat pants that you wore. I always new you were ready for work when you had them on.,
LikeLiked by 1 person
I just love you Barry. My first CarpenterBuddy xo
LikeLike
Thank you very much for your detailed explanation throughout your project. Great work. I am making a coffee table for a friend with an American Indian design under epoxy. This was my first time using Epoxy … In fact my first time ever making any furniture. I learned a lot from your trials that will help me to fix some of my screw ups with applying the first coat of the Epoxy. Thank you … I hope my table comes out half as nicely as your bar!!!
LikeLike
Your welcome, I am glad my trials and errors helped you. Epoxy can have a learning curve for sure.. I am sure your friend will love the coffee table.
LikeLike
How does the epoxy hold up with use? Water rings from glasses?
LikeLike
It looks as fantastic as the day I finished it. It can’t get water rings because of how it’s made. It’s like a solid glass like hard surface. I was worried about hit coffee cups at first but even those didn’t leave any marks. We are really happy with it.
LikeLike
I am getting ready to do this exact project within the next couple of weeks. I went to the ebay link and was reading on the mfg recommendations. It mentioned not pouring more than 1/8″ at a time. Just wondering if you still recommend just “going for the gold” and pouring the whole thing, minus too much heat? Also, does it settle at all as it dries or does it dry and harden so fast that it stays level? Appreciate any input you can provide!
LikeLike
Hi Jen. I don’t have the patience to do it in 3 or 4 pours. If I was to do this all over again I would do it in two pours. First, one pour to almost or just cover the corks and the crevices. That makes it easier for any air bubbles to be taken care of and for those corks that decide to lift. (I had two that floated. I would guess they weren’t glued down properly) Use a toothpick to press it back down if that happens. Once the epoxy starts to set it won’t float anymore and will stay in place, but make sure you pay attention to it because if it floats up and you didn’t notice there isn’t much you can do. Second, I would do a finish pour whether that is 1/8 or 1/4″. The epoxy settles and goes level very quickly, but doesn’t set as fast as I was scared it would. You have time to spread into the corners etc. When you add the heat it levels out completely to a glass finish. Hope that helps. Message if you have any more questions.. Can’t wait to see your finished project.
LikeLike
Also, I now know that if there is some small defects after any pour, a light sand, a wipe with alcohol or acetone, and a thin top coat will fix anything.
LikeLike
Well it went terribly wrong, similar to your stalagmite situation, ok, exactly like that. So I will be seeing if it can be fixed like yours. Once you sand and pour the thin layer, can you tell at all that it was sanded or is it totally clear again? So annoyed, drinking wine now to ease the pain.
LikeLike
Oh no!! Sorry to hear. You will not be able to tell. I had craters that needed filling, gouges, and it looked opaque white from all the sanding. But once the new layer of epoxy went on all was rectified. Enjoy your wine and tell yourself tomorrow will be better. If you need to call me tomorrow I can send you my phone number
LikeLike
Love this! I’m doing a pub height 60″ round table with the corks and epoxy. We’ve been saving corks for years and many have dates and occasions written on them. Your tips are great and the bar looks beautiful! I’ll let you know how it goes.
LikeLike
I tried 3x to ask my question via my mobile phone…. quite frankly, I hope my inability to successfully submit my questions will in no way be a reflection of the outcome of my project!!! I think you’re super cool for posting your experience and answering questions for people that are in your footsteps even years later and I was hoping that you would do the same for me. My number is 206-235-1621 and I would definitely definitely definitely definitely appreciate I have about five six questions that I would like to ask you that I would have no problem whatsoever being published its just apparently I am challenged and I for some reason can’t get them through on this website thank you so much
LikeLike
I replied to your message by text but I’m not sure if you got it.
LikeLike
Hi there. Planning to do a similar project. How did you know how much of the epoxy to mix? Where did you purchase such a large amount of it?
LikeLike
Thank you so much for sharing! I am doing the same project for 8′ x 3′ bar countertop!! I now feel a renewed sense of confidence since reading your experience. 😊
LikeLike
I would like to use a 5 gallon bucket lined with silicone & filled with corks, pour epoxy into it, let it dry, dump out, sand the corners gently & have a stool. Do you think this would work? Any suggestions?
LikeLike
Wondering where you got the bar rail trim from? Beautiful finished project.
LikeLike
It wa purchased from a specialty lumber warehouse here in Canada. I know Home Depot and various other online retailers sell a similar profile of it in the US Here is a link to a quick search on Home Depot
https://www.homedepot.com/p/House-of-Fara-1-1-8-in-x-4-1-2-in-x-48-in-Oak-Chicago-Bar-Rail-Moulding-BR4504/302007862?cm_mmc=Shopping%7CG%7CBase%7CAll-Products%7CAll%7CAll%7CPLA%7C71700000014585962%7C58700001236285396%7C92700010802552466&gclid=Cj0KCQjw9ZDeBRD9ARIsAMbAmoakKn7u_P5ERQddVftDOjB2yyBxxwDiMxhVWLoLH4WYLlT933ZUJqYaApU4EALw_wcB&gclsrc=aw.ds&dclid=CLynytCVid4CFQxuwQodXHkNDQ Hope this helps
LikeLike
[…] 2Source 3Source 4Source 5Source 6Source 7Source 8Source 9Source 10Source ← Hello […]
LikeLike
[…] 4Source […]
LikeLike
Mina, I saw your post over a year ago and kept it knowing after 39 years in my home this was the winter I was going to finally finish my basement!!!!!! First question, is it necessary to cut the corks down and instead of gluing I was planing on secure them down with my brad nailer gun,your thoughts!!???
LikeLike
No it’s not necessary however the amount of epoxy you will need will increase. I don’t see why nailing them down wouldn’t work. I should have tried that. If I was to do it again I would lightly paint a thin layer over the corks to prevent struggling with air bubbles in the final pour. The tiny holes in the corks was a pain. Also there are so many new epoxy brands on the market now. If I was to do it over again I would look at using Ecopoxy brand. Good luck and please message back to tell me if your success.
LikeLike
Do NOT not seal the corks. Trust me. It will end badly. Tack them down however, but seal the corks before the pour.
LikeLike
We’re considering doing this for a wine cellar floor – we know we’d have to put some sort of “sand” like substance on it to keep us from slipping, especially in the humidity of a cellar. Any thoughts or tips? Thank you and yours looks GREAT!!!!!
LikeLike
Hi
Your post comes as a blessing as I am doing a wine barrel top with corks and I had seen your post. I finally did the pour today and it leaked and formed lot of bubbles at the top even after I used very light heat. Now only hope is sanding and repouring and hoping it will work. I think it is almost mandatory to pour a seal coat before the final pour is that bubble situation and leak problem will be fixed let’s see if I am able to fix mine
LikeLike
This looks like an amazing project. I am hoping to make an epoxy cork charcuterie board. Do you need a heat gun specifically ? Or would hair dryer on low work at smaller scale? Also do you think I need a Woden frame to hold cords to make board or could I create a mold to set the board and pull it off so it’s just a clear epoxy board? Thanks for the help!
LikeLike
Sorry Jessica I am just seeing this message now. No, you don’t need a heat gun specifically you could try to use a butane torch or lighter or a propane torch. A hairdryer will blow too much air. I am not sure about the type of board you would need to make a mold. You could look into silicone molds. There is a lot of information online. Unfortunately, I am no help with this part.. Sorry
LikeLike
[…] how to make a cork or cap bar top […]
LikeLike
That countertop is a really good idea! Some put coins or cards, but a cork design for a bartop is really awesome! I’m thinking of making an epoxy counter somewhere in the house (I’m thinking the laundry area/extended kitchen) but I really like to get every bit of information I can get before starting. I’ve been reading many blogs and articles but I want to find more information on epoxy counters especially for those who’ve already made them. How was the aftercare? Did it yellow like what happened to others? Hope to hear from you soon!
LikeLike
I just made a bar like this, I feel like it’s in avoidable to not get the bubbles and have to sand it down… possibly too much air coming out of the cork. I’m at the stage where I feel like it’s ruined. And need to wait for it to dry so I can do damage control 😦
LikeLike
[…] Vérifiez les détails du didacticiel […]
LikeLike
I love your post and was inspired while looking for ideas to make a coffee table for my screened in porch It’s my first time using epoxy and really want this to turn out after all the work I have already put in.
The table will be in a covered area but will still ensure the fluctuation of outdoor temperatures What is the best epoxy to use for this project?
Thanks for your help!
LikeLike