One of my favourite childhood memories is getting to go to the local fair at the end of the summer. After speeding through the strip of ride tickets we would get a candy apple to eat on our ride home from the fair. Four children crammed into the backseat of the car, I am sure we were getting everything and each other sticky. My siblings were quite excited when I learned to make them at home.
This is a tradition I continued once I had children. When they were really little I made caramel apples instead of candy apples as they were easier for them to eat. They expressed they wanted the red kind. So I started added color to the caramel. It worked, and they were quite happy with the brightly colored apples covered in gooey goodness. Of course, you can still dip these apples in chopped nuts, chocolate chips, sprinkles or whatever you imagination and taste buds want. I always have little candy transfers on hand that I make with the leftover royal icing when decorating cookies. So Halloween faces were born. Place them on the caramel with in 10-15 minutes and they stick to the caramel. I like to make them at Halloween for a few of the”special little goblin visitors” on our street. Here is the step by step process that works for us. Chelsea jumps at the chance to make these apples and of course she helped with this post. Thank you for your help, sweetie. xo
Caramel apples are apples dipped and covered in a coating of soft and chewy caramel that has been cooked to 242-248°F on a candy thermometer. The caramel will harden enough to stay on the apple but will remain chewy. Candy apples are made a similar way, minus the dairy and the coating is cooked to a hard crack stage on the candy thermometer 290-305°F. Both of these coatings are super hot, and I must give you a word of caution that an adult should do the cooking and dipping. This recipe is for the softer chewy caramel apples, not the hard crack candy apples. Both can be made any color though 🙂
Easy Colorful Caramel Apple Recipe
Ingredients:
Basic Caramel Apples – Use this without food color to make basic caramel apple coating.
- 1.5 cup sugar
- 3/4 cup corn syrup
- 1 cup whipping cream
- 1/4 cup butter
- 1. 5 tsp vanilla or flavoring of choice
For Colored Caramel
- 1/2 tsp food color of choice (I like Americolor)
- *optional 1/2 tsp white food color – this makes the color less opaque but makes lighter flecks throughout the caramel (kinda of looks like glitter was added to the caramel)
Optional
Various nuts, chocolate chips, candies, or sprinkles to dip the candy apples into. I dip this immediately after dipping into the caramel coating before setting down
 Wash and clean the apples. If your apples are coated in wax clean in 4 cups of hot water (you need to be able to put your hands in), 2 Tbsp of lemon juice and 2 Tbsp of baking soda. Scrub the wax off, and dry. Add a candy apple stick, twig, popsicle stick, or chopstick to the apple and set aside on a baking sheet covered in parchment paper, silpat, waxed paper or a slab of marble with a thin spray of oil or butter. In my opinion apples are best room temperature. They cover better as they caramel doesn’t harden as fast making it too thick and the chances that the apples will sweat under the caramel making it fall off is lessened.
 Add the sugar to the tall saucepan
 Add the corn syrup
 Give the sugar and corn syrup a stir to mix together. Some recipes now say not to do this but I have always done it for caramel
 Remove the spoon and start to melt the sugar and corn syrup over medium heat. This should take 3-4 minutes
 While the sugar is melting add the flavoring of choice to the cream. We chose bubble gum and vanilla
 Add the vanilla
 To make pumpkins we added 1/2 tsp of orange food color
 And 1/2 tsp of white food color. This is optional if you have it, however it is not necessary. It will leave white speckles in the caramel that look like white glitter. If you want it less opaque you can add a 1/2 tsp more of orange food color
 Stir to combine
 All ready to add
 Once the sugar is completely melted together with the corn syrup, add the cream
  Stir until completely incorporated. It will bubble up a bit from the cold cream. Stirring and a tall pot keeps this from going over the sides of the pot
 Now that everything is liquid, add the candy thermometer to the side of the sauce pan
 Bring to a boil over medium/high heat. Do not try to do this too fast or it may scorch before it reaches the correct temperature and effect the color
 Bring the caramel to 244°F Remove from heat and plunge into the ice water you previously prepared. Remove immediately from the ice water. It’s only to remove the residual heat from the pan and to keep it from cooking longer.
 Add the butter stir until completely added and blended into the caramel. The butter gives that shine to the apples. If you prefer more matte looking apples try omitting the butter.
 immediately start dipping the apples into the caramel. It is easier if you tilt the pot while swirling the apples
 You can cover the apple with caramel up to the stick or you can leave a little exposed. I am leaving a little exposed to leave room to spoon a small amount of the green caramel in that area. Swirl for 10-15 seconds while holding over the pot to allow excess caramel to fall off. Set aside on to the prepared baking sheet
 Here I added the cream from the start just to see what would happen. The cooking process took a little longer for some reason, however the result was the same. I cooked to the same temperature of 244°
  Repeat until all the apples are finished. This recipe covers about 7-8 medium-sized apples. If you have excess caramel pour on a parchment covered pan and let cool. Chop the caramel and wrap in parchment if you like..
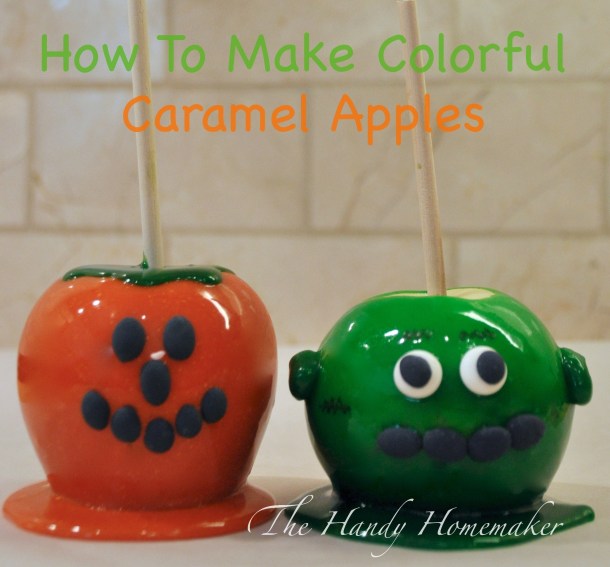
 Chewy Pumpkin Orange Caramel Apples
 Chewy Frankenstein Green Caramel Apples
 With royal icing candy faces added.
  Royal icing candies to make Frankenstein
Tips:
- ALWAYS keep a bowl of ice water nearby so if I happen to get any on me, I can quickly dip my finger in the ice water to stop the burn.
- Put cold ice water in a large bowl or the sink to plunge my caramel or candy coating into to stop the cooking process.
- Don’t double the batches. It is safer to work in small batches. Plus your caramel will start to get too thick by time you get to the last apples for smooth dipping.
- Room Temperature apples work best
- Have all ingredients measured and set up before starting coating. Once it is ready it waits for no one.
- After a couple of hours once the caramel is completely set you can place into cellophane bags for gifting. Tie with colored ribbon.
- Caramel apples last 2 days at room temperature. They will keep a little longer if refrigerated. However placing them in gift bags will be difficult as they will get sticky.
- If all this information has you saying that it makes more sense to use caramel candies, in my opinion the flavour doesn’t compare. Plus you can make it any flavour you want, and you know what the ingredients are. Takes too much time to make from scratch…. I’m willing to bet you’ve never sat down to peel those wrappers off a bowl full 😉


Leave a comment