 I love the look of these rosettes as they are not perfect. No two rosettes are alike and it reminds me of a wild rose garden. Plus, it really looks beautiful and romantic. This cake is a no stress decorated cake. It is decorated in minutes. Really!! Even if you are a beginner, you will be happy with the outcome. If you want perfectly aligned swirls of icing, well this may not be the post your looking for.
How To:
- Bake three 6″ cakes out of a recipe of your choosing or try my Chocolate cake recipe or Vanilla cake recipe .
- Level off the rounded top of each baked cake.
- Wait about 10 – 15 minutes of cooling in pan.
- Remove the cakes from the pan.
- With a cake leveler (mine is wilton) or using a serrated knife cut the top layer off. If the cake doesn’t have a high dome then you can skip this step.
- One cut, place the cake back on a cooling rack and cover with parchment.
- While the cakes are cooling make your icing if you have not already done so.
- Fill your icing/pastry bag with icing. Click link to make my Vanilla Buttercream Icing recipe and how to fill your icing bag.
- Put the desired size star tip on the filled icing/pastry bag. I use the Wilton 1M open star tip for this cake.
- Place the cake on a cake stand or turntable. Dabbing the stand or turntable with icing to keep the cake from slipping around. If you don’t have a cake stand you can use a plate, a cake board, or a piece of cardboard covered in tin foil.
- Since the 1M tip is a large tip I find it just as easy to use that tip to fill the cake layers and for ease of piping on large lines of frosting around the cake to make the ‘crumb coat’. Which is to coat the entire cake lightly with icing to seal in the cake and its crumbs before adding the finished decorative icing. This also helps the outside layering of icing adhere to the cake and seal in the moistness.
- You can use your spatula to scoop icing on the cake if you prefer. I find I get less crumbs piping it on.

- Using an icing spatula/spreader Mine is straight but you can use an offset spatula if you have that style. I’ve used a butter knife in a pinch. This layer does not need to perfect just covered and close to level. The finished cake looks better if you try to make sure your layers and top are eye level. Unless of course you are making a “Rosette Leaning Tower of Pisa Cake” 😉 Crumbs in this layer are normal, it’s called the crumb coat remember.
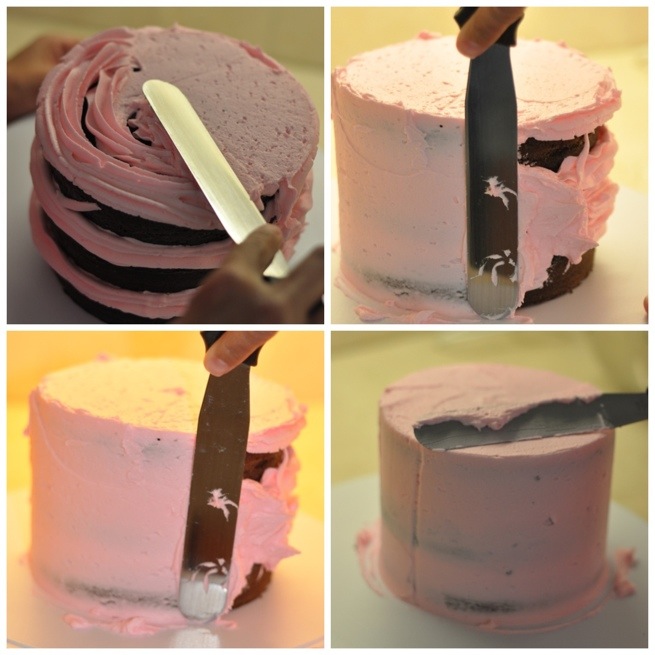 Roughly smooth the icing that is on the top of the cake, then the sides. This is where a turntable cake stand helps. You hold the spatula straight up and turn the turntable with the other hand. Go back over the sides of the cake making the icing as smooth as possible. You don’t need to have thick icing at this point. Remove excess icing that collects on the spatula.
- As you smooth the sides icing will gather on the top of the cake. Working from the edges angle the spatula to a 45° angle and bring the icing towards the center. Do this step until your cake is has a relatively smooth crumb coat.

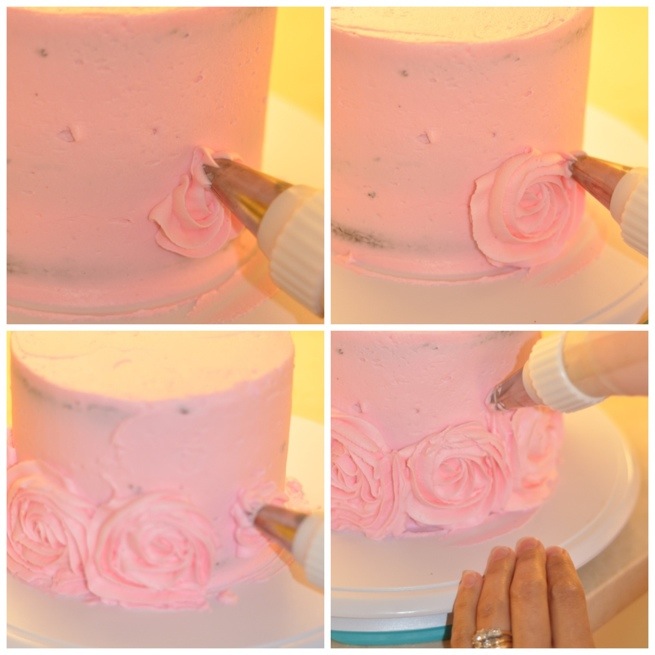
- Starting at the base of the cake make a small rosette swirl using the same technique I used on the matching cupcakes. remember piping rosettes while holding the video camera is not easy 😉
- Practice the icing technique on a sheet of parchment before starting to decide if you want your rosettes to have one or two rotations (circles) around the center of each flower. Once you finished your practice add the icing back into the bowl of icing to reuse.
- Place the tip close to the cake, apply slight pressure to the piping bag so that the icing attaches to the cake. Start taking the icing around the center icing in a circle pattern by pulling up and dragging all the way around the center. Continue piping the desired amount of rotations of the rosette. As you are finishing your rosette stop applying pressure as you keep the rotation going to allow the icing to pull softly away. (I used a two rotation rosette for this cake)
- Leaving enough room to give a the same full rotation start the next rosette on the same line of the cake. The finished rotation should lightly touch the last rosette.
 Start the second layer in between two rosettes on the bottom layer. You can place a small dash of icing on any space left open and it will not be noticeable once finished. To do the place your tip close to the cake apply a small amount of pressure to attach the icing to the cake and immediately release pressure while pulling upwards or towards the unfinished cake.
- If I make smaller rosettes or on a different sized cake, you can put a third layer of rosettes that are part of the top of the cake and partly covering the side space that is left. As well if you messed up, gently scrape the frosting off and re-pipe a rosette.

- This particular cake ended with a tiny space at the top of the cake in between each rosette. Fill with a small dab of icing pulling sideways towards the next layers of rosettes to be added on the top layer.
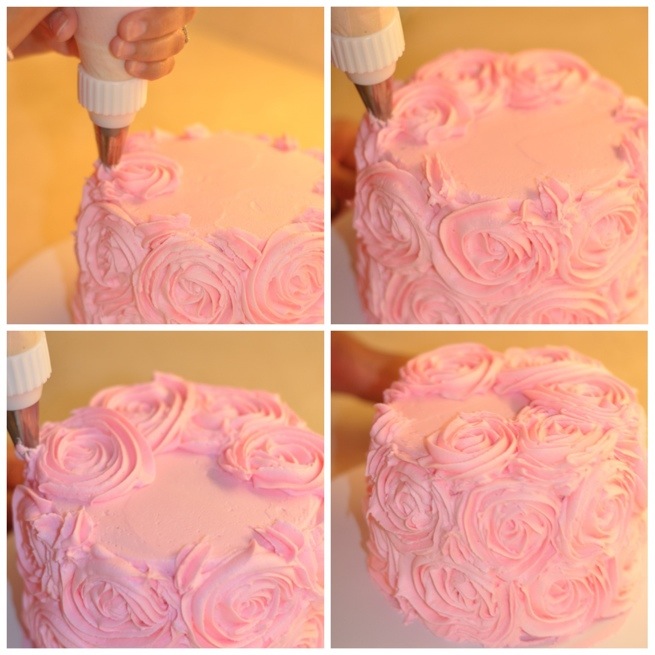
- Add the next layer of rosettes around the top edge. Depending on the size of the cake and your rosettes, you may have more than and outside layer and a centre layer. I wanted these rosettes to be similar in size to the coordinating cupcakes.
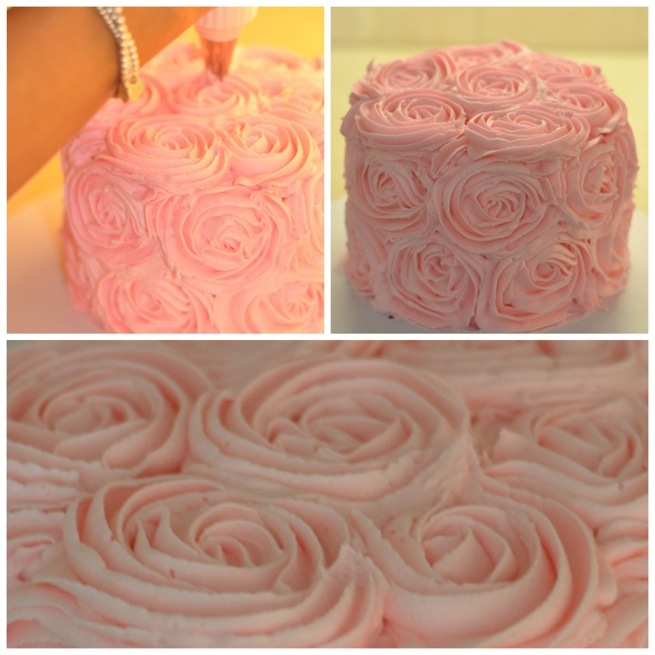
- The Icing Rosettes are supposed to slightly touch or overlap on the edges to get the desired look.
- Cut and enjoy.
TIP-
I usually chill finished cakes in the refrigerator if I still have on the turntable before transferring to a cakestand, Chill if not using right away and take out 2 hours before serving.


Leave a comment